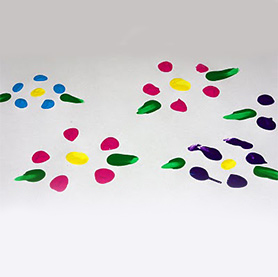
Here’s a fun art activity that’s sure to make any kid smile! Grab some empty plastic soda and water bottles from your recycle bin and you’re ready to get started. DIY soda bottle stamping ignites kids’ imaginations by letting them explore their creative side.
Here’s what you need:
- Different sized water and soda bottles with flower shaped bottoms
- Kids’ paint
- A large piece of white paper
- Paper plates
Here’s what to do:
- Pour each color of kids’ paint onto a separate paper plate, and give each plate its own bottle, so paints don’t mix.
- Lay out a large piece of paper to give your little artist room to stamp.
- Grab a bottle and press it into the kids’ paint on one of the plates, completely covering the bottom of the bottle.
- Remove the painted bottle from the paint and stamp it onto the paper creating a flower shape.
- Put that bottle back onto its plate.
- Grab another bottle, press it into the kids’ paint on its plate and stamp the bottom of the bottle onto the paper. Look at that, you’ve made a second flower!
- Create as many flowers in as many colors as you’d like by repeating the press and stamp steps.
- Once you’re done stamping, you can press your finger into the paint and draw little leaves for your flowers. Maybe add a bit of color to the center of your flowers, too, while you’re at it. It’s up to you!
- If you’re still in the mood to stamp, consider pressing the top of a bottle lid into some paint and stamping it onto the paper to create polka dots. That’ll add a little extra fun to your creation.
Thanks for the great idea, Happiness is Homemade! For more information and pictures, please click here.


